Green – 2½ oz (140 yards)
Rose – 1 oz (55 yards)
Crochet Hook Size H (5 mm)
Yarn Needle
Fiberfill (optional, for flowers if you want them puffier)
Gauge Swatch: 4″ (10 cm) square
Ch 15.
Row 1: Sc in second ch from hook and in each ch across: 14 sc.
Rows 2–16: Ch 1, turn; sc in each sc across.
Finish off.
STITCH GUIDE
TREBLE CROCHET (abbreviated tr):
YO twice, insert hook in sp indicated, YO and pull up a loop (4 loops on hook), (YO and draw through 2 loops on hook) 3 times.
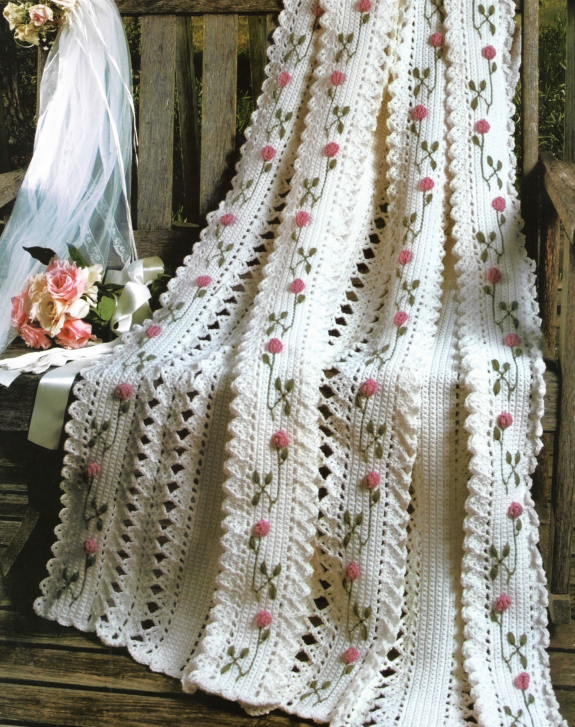
STRIP A (Make 4)
With White, ch 233.
Row 1: Hdc in fifth ch from hook (4 skipped chs count as first hdc plus ch-1, now and throughout), (ch 1, skip next ch, hdc in next ch) across: 116 hdc and 115 ch-1 sps.
Row 2 (Right side): Ch 1, turn; sc in each hdc and in each ch-1 sp across: 231 sc.
Note: Loop a short piece of yarn around second sc made to mark Row 2 as right side and bottom edge.
Row 3: Ch 1, turn; sc in each sc across.
Row 4: Ch 1, turn; sc in first 36 sc, place marker around post of last sc made for Rosebud placement, *sc in next 38 sc, place marker around last sc made for Rosebud placement; repeat from * across to last 5 sc, sc in last 5 sc.
Rows 5–7: Ch 1, turn; sc in each sc across.
Row 8: Ch 1, turn; sc in first 17 sc, place marker around post of last sc made for Rosebud placement, *sc in next 38 sc, place marker around last sc made for Rosebud placement; repeat from * 4 times more, sc in last 24 sc.
Rows 9–11: Ch 1, turn; sc in each sc across.
Row 12: Ch 3, turn; skip next sc, hdc in next sc, (ch 1, skip next sc, hdc in next sc) across; do not finish off: 115 sps.
EDGING
Rnd 1: Ch 3 (counts as first dc), do not turn; work (2 dc, ch 1, dc, ch 1, 2 tr) around post of last hdc made; working in end of rows, skip next 3 rows, slip st in next row, skip next row, (2 dc, ch 1, 2 dc) in next row, skip next row, slip st in next row, skip next 2 rows, (2 tr, ch 1, dc, ch 1, 2 dc) in corner sp, place marker in last dc made for joining placement, (3 dc, hdc) in same sp, slip st in next sp, *(2 dc, ch 1, 2 dc) in next sp, slip st in next sp; repeat from * across to last sp, (hdc, 5 dc, ch 1, dc, ch 1, 2 tr) in last sp, skip next 2 rows, slip st in next row, skip next row, (2 dc, ch 1, 2 dc) in next row, skip next row, slip st in next row, skip next 3 rows, repeat from * to * once, (hdc, 2 dc) in last sp; join with slip st to first dc, finish off: 122 ch-1 sps.
First Side: With right side facing, join White with slip st in marked dc at end of Strip, remove marker; ch 1, skip next dc, (dc, ch 3, dc) in next dc, ch 2, skip next 2 sts, slip st in next slip st, ch 2, *(dc, ch 3, dc) in next ch-1 sp, ch 2, skip next 2 sts, slip st in next slip st, ch 2; repeat from * across to next corner group, skip next 2 sts, (dc, ch 3, dc) in next dc, ch 1, skip next dc, slip st in next dc, leave remaining sts unworked; finish off: 58 ch-3 sps.
Repeat for Second Side.
FINISHING
ROSEBUD
With right side and bottom of Strip facing, join Rose with slip st around post of any marked sc; ch 4, 4 tr around post of same sc, drop loop from hook, insert hook in top of beginning ch-4, skip next 2 sc on same row as marked sc, insert hook in next sc, hook dropped loop and pull through all sts on hook; finish off, remove marker.
Repeat for remaining 11 Rosebuds.
STEMS AND LEAVES
Thread yarn needle with one strand of Green. With right side facing, beginning at top of Strip, and using Chart and photo as a guide for placement, add Stems and Leaves to Strip.
Stems: Begin Backstitch by bringing needle up at 1. Go down at 2 and come up at 3. The second stitch is made by going down at 1 (Fig. 12) and coming up at 4. Continue in same manner.
Leaf: Begin Satin stitch by bringing needle up at 1 and down at 2 (Fig. 13). Continue in same manner making 5 stitches for each Leaf.
STRIP B (Make 3)
With White, ch 233.
Row 1: Hdc in fifth ch from hook, (ch 1, skip next ch, hdc in next ch) across: 116 hdc and 115 ch-1 sps.
Row 2 (Right side): Ch 1, turn; sc in each hdc and in each ch-1 sp across: 231 sc.
Note: Mark second sc made on Row 2 as right side and bottom edge.
Rows 3–11: Ch 1, turn; sc in each sc across.
Row 12: Ch 3, turn; skip next sc, hdc in next sc, (ch 1, skip next sc, hdc in next sc) across; do not finish off: 115 sps.
EDGING – Work same as Strip A.
LACE STRIP (Make 6)
With White, ch 233.
Foundation Row: Hdc in fifth ch from hook, (ch 1, skip next ch, hdc in next ch) across: 116 hdc and 115 ch-1 sps.
Rnd 1 (Right side): Ch 4 (counts as first tr), turn; (3 dc, hdc) in first ch-1 sp, slip st in next ch-1 sp, (2 dc, ch 1, 2 dc) in next sp, slip st in next sp; repeat across to last sp, work [hdc, 3 dc, tr, (ch 1, tr) 3 times, 3 dc, hdc] in last sp, place marker in last sp for joining placement, join with slip st to first tr, do not finish off.
JOINING
The method used to connect the Strips is a no-sew joining also known as “join-as-you-go.” Using Placement Diagram as a guide, crochet each Lace Strip to a Strip A and a Strip B with bottom edges at same end.
First Side – Joining Row: Ch 1, skip next dc, dc in next dc, ch 1; holding Lace Strip and either Strip A or B with wrong sides together, slip st in second ch of corresponding ch-3 on adjacent Strip, ch 1, dc in same dc on Lace Strip, ch 2, skip next 2 sts, slip st in next slip st, ch 2, dc in next ch-1 sp, ch 1, slip st in second ch of corresponding ch-3 on adjacent Strip, ch 1, dc in same sp on Lace Strip, ch 2, skip next 2 sts, slip st in next slip st, ch 2; repeat across to next corner group, skip next 2 sts, dc in next dc, ch 1, slip st in second ch of corresponding ch-3 on adjacent Strip, ch 1, dc in same st on Lace Strip, ch 1, skip next dc, slip st in next tr, leave remaining sts unworked; finish off.
Second Side – Joining Row: With right side facing, skip next 3 ch-1 sps from last slip st made and join White with slip st in next tr; work same as First Side. Design by Mary Ann Brooks.