Sunny Spread Throw Crochet Pattern

As the sun starts to warm up our days and nature comes alive with vibrant colors, it’s the perfect time to embrace the spirit of spring with a beautiful crochet project. Introducing the Sunny Spread Throw! This delightful crochet pattern combines the warmth of handmade craftsmanship with the cheerfulness of sunny days. Whether you’re looking for a cozy blanket to snuggle under during cool evenings or a decorative accent to brighten up your living space, this throw has you covered.

INSTRUCTIONS
Notes:
• Ch 3 at beg of rnd counts as dc throughout.
• Ch 4 at beg of 6th rnd counts as tr.
• Join all rnds with sl st to top of first st.
• Dcfp are worked around dcfp from previous rnd to create raised, spoke-like shape, and count as an inc as it is worked around previously worked sts.

ABBREVIATIONS
Approx = Approximately
Beg = Begin(ning)(s)
Ch = Chain(s)
Dc = Double crochet
Dcfp = Yoh and draw up a loop around post of next stitch at front of work, inserting hook from right to left. (Yoh and draw through 2 loops on hook) twice.
Hdc = Half double crochet
Inc = Increase
Rnd(s) = Round(s)
RS = Right side
Sc = Single crochet
Sl st = Slip stitch
Sp(s) = Space(s)
St(s) = Stitch(es)
Tog = Together
Tr = Treble crochet
Yoh = Yarn over hook

Sunny Spread Throw Crochet Pattern

Sunny Spread Throw Crochet Pattern

MEASUREMENT
Approx 55″ [140 cm] square.
GAUGES
12 sc and 15 rows = 4″ [10 cm].
Motif = Approx 7¼” [18.5 cm] square.

Pattern:

Notes:
• Ch 3 at beg of rnd counts as dc throughout.
• Ch 4 at beg of 6th rnd counts as tr.
• Join all rnds with sl st to top of first st.
• Dcfp are worked around dcfp from previous rnd to create raised, spoke-like shape, and count as an inc as it is worked around previously worked sts.
MOTIF (make 49)
Ch 4. Join with sl st to first ch to form ring. See diagram on page 3.
1st rnd: (RS). Ch 3. 11 dc in ring. Join. 12 AD.
2nd rnd: Ch 3. Dcfp around first dc. *1 dc in next dc. Dcfp around same st as last dc. Rep from * around. Join. 24 sts.

3rd rnd: Ch 3. 1 dc in next st. Dcfp around same st as last dc. *1 dc in each of next 2 sts. Dcfp around
same st as last dc. Rep from * around. Join. 36 sts.
4th rnd: Ch 3. 1 dc in each of next 2 sts. Dcfp around same st as last dc. *1 dc in each of next 3 sts. Dcfp around same st as last dc. Rep from * around. Join. 48 sts.

5th rnd: Ch 3. 1 dc in each of next 3 sts. Dcfp around same st as last dc. *1 dc in each of next 4 dc. Dcfp
around same st as last dc. Rep from * around. Join. 60 sts.
6th rnd: Ch 4. *1 dc in next st. 1 hdc in next st. 1 sc in each of next 9 sts. 1 hdc in next st. 1 dc in next st. 1 tr in next st. Ch 3.** 1 tr in next st (corner made). Rep from * twice more, then work from * to ** once. Join. 60 sts and 4 ch-3 sps (corners).

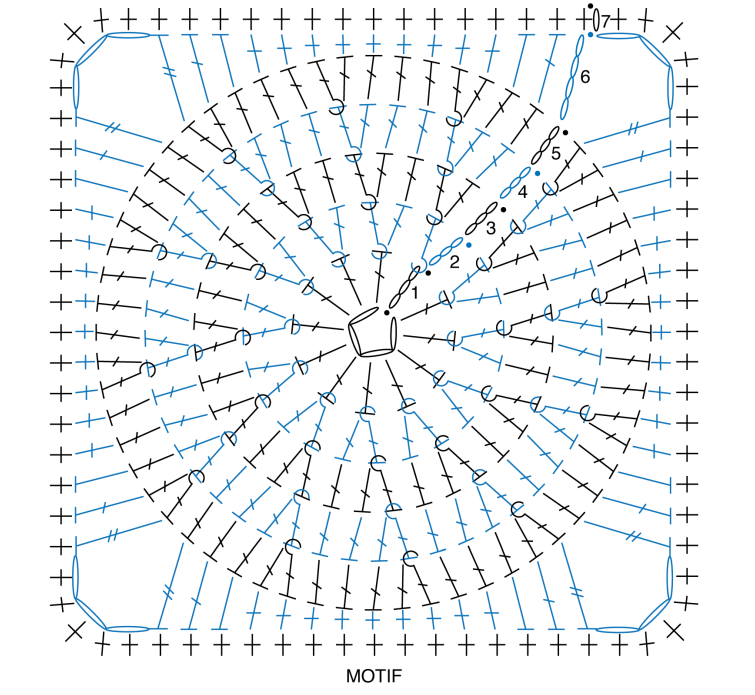
7th rnd: Ch 1. 1 sc in first st. 1 sc in each of next 14 sts. *5 sc in next ch-3 sp. 1 sc in each of next 15 sts.
Rep from * twice more. 5 sc in last ch-3 sp. Join. 80 sc. Fasten off.
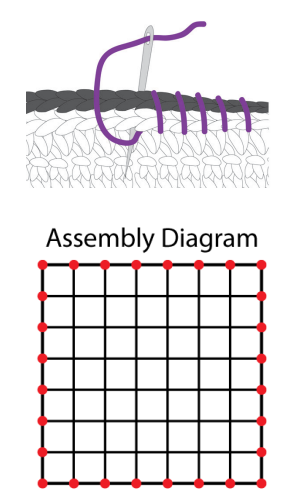
Assembly
Sew Motifs tog into 7 x 7 grid. Seam Motif edges with RS tog, whipstitching through both loops. Do not sew into center sc of 5-sc corners along outermost squares (shown in Assembly Diagram in red) as these will be worked into during 1st rnd of Edging.

Diagram

Edging
Notes:
• Ch 3 at beg of rnd counts as dc throughout.
• Join all rnds with sl st to top of first st.
1st rnd: (RS). Join yarn with sl st to top right corner. Ch 1. Work 1 rnd of sc evenly around all outer edges, having 3 sc in each corner. Join. 592 sc (145 sc along each edge and 3 sc in each corner).

2nd rnd: Ch 3. Work 1 rnd of dc evenly around all outer edges, having 5 dc in each corner. Join. (Sl st in next dc) twice. 608 dc (147 dc along each edge and 5 dc in each corner).
3rd rnd: Ch 3. 4 dc in first dc (center dc of 5-dc corner). *[(1 dc in each of next 2 dc. 1 dcfp around next dc. 1 dc in each of next 2 dc) 15 times.** 1 dc in next dc. Rep from * to ** once more.*** 5 dc in next dc (center dc of 5-dc corner)] 3 times. Rep from * to *** once more. Join. (Sl st in next dc) twice. 624 dc (151 sts along each edge and 5 dc in each corner).

Access The Pattern
Related ContentBeautiful Granny Square

Granny squares hold a special place in the hearts of crocheters worldwide.

Access The Pattern

4th rnd: Ch 3. Working all dc in back loops only, 4 dc in first dc (center dc of 3-dc corner). [1 dc in each of next 2 dc. *(1 dc in each of next 2 dc. 1 dcfp around next st. 1 dc in each of next 2 dc) 15 times.** 1 dc in next dc. Rep from * to ** once more. 1 dc in each of next 2 dc.*** 5 dc in next dc (center dc of 5-dc corner)] 3 times. Rep from * to *** once more. Join. 640 dc (155 sts along each edge and 5 dc in each corner).
5th rnd: Ch 1. Work 1 rnd of sc evenly around, having 3 sc in each corner. Join. 648 sc (159 sc and 3 sc
in each corner). Fasten off.

Diagram

Diagram

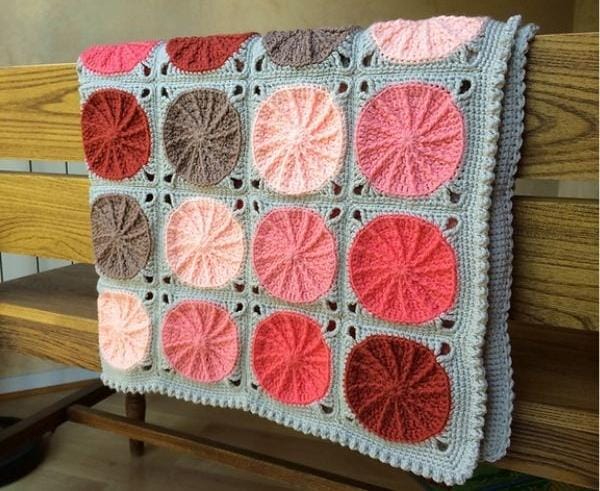
Crocheting the Sunny Spread Throw is not only a joyful and creative endeavor but also a practical one. It’s a project that brings warmth and comfort to your home while adding a cheerful touch to any room. Whether you’re a seasoned crocheter or just starting out, this pattern is perfect for anyone looking to brighten up their space with a little bit of sunshine. So grab your hooks and yarn, and let’s spread some sunshine!

You Are Here:

We use cookies to offer you the best experience on our website. By continuing to browse, you confirm that you accept these terms.