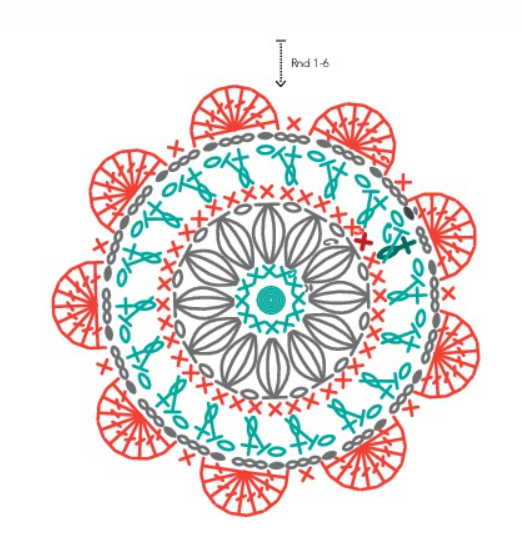
Rnd 5: (join yarn B in any ch-space, make your first stitch a standing stitch) (sist in ch-space, ch 3) repeat 18 times, sist in initial slst [18+ 54 ch]
Rnd 6: (sc in next ch-space, 9 dc in next ch-space) repeat 9 times, fasten off with an invisible join in initial dc [9 petals]

Diagram
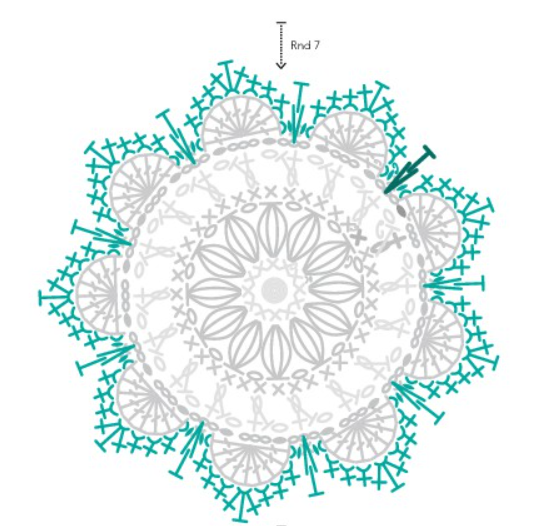
Rnd 7: {Join yarn A, make your first stitch a standing spike stitch over sc in Rnd 6 and into ch-space of Rnd 5 below. Work all stitches in this round in BLO except for spike stitches) (spike-hdc over top of sc into ch-space of Rnd 5 below, sist in first dc of petal, sc in next 3 st, sc + hdc + sc in next st, sc in next 3 st, sist in last st of petal) repeat 9 times, fasten off with an invisible join in initial slst [9 petals]

Diagram
Note: In Rnd 8 we will be working a number of stitches around the bar of spike stitches in Rnd 7. In the diagram we have depicted these stitches as worked in third loop, as no specific symbol is available. Please take this into account when working this round.
Rnd 8: {with the right side of the flower facing you, work behind the petals. Join yarn C under the bar of the spike hdc made in Rnd 7, make your first stitch a standing stitch. Work this round behind Rnd 6. It helps to fold adjacent petals right sides together while you work the sc. Work chains loosely in this round) (sc around bar of spike hdc, ch 4) repeat 9 times, slst in initial sc [9 + 36 ch]
Rnd 9: {fold the petals forward as you work this round) ch 1, 7 hdc in each of next 8 ch-spaces, 8 hdc in last ch-space, slst in initial hdc [64]
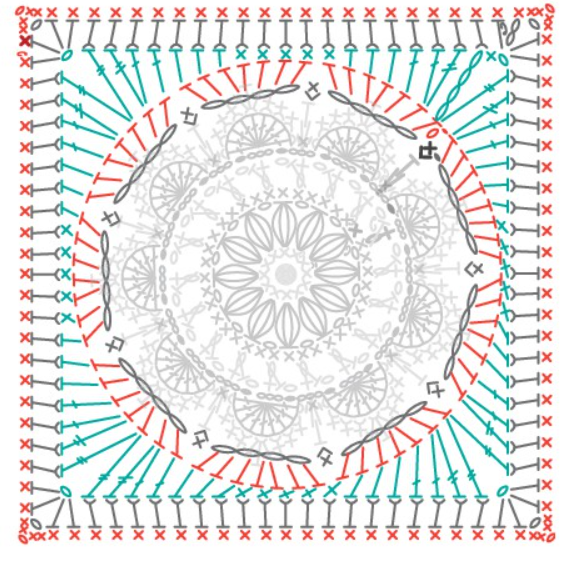
Rnd 10: ch 4 (count as tr), (htr + dc in next st, dc in next st, hdc in next 3 st, sc in next 5 st, hdc in next 3 st, dc in next st, dc + htr in next st, tr + ch 1 + tr in next st) repeat 3 times, htr + dc in next st, dc in next st, hdc in next 3 st, sc in next 5 st, hdc in next 3 st, dc in next st, dc + htr in next st, tr + ch 1 in next st, sc in 4th ch of initial ch 4 [76 + 4 ch] Note: You start Rnd 11 by working over the joining sc. Treat the joining stitch as a chain loop and work over it, covering it entirely.
Rnd 11: {work this round in BLO) ch 2 (count as a hdc) + hdc over joining sc, hdc in next 19 st, (2 hdc+ch 1 + 2 hdc in ch-1-space, hdc in next 19 st) repeat 3 times, 2 hdc + ch 1 in corner-space, fasten off with an invisible join to first true hdc [92 + 4 ch]
Rnd 12: (join yarn B in first stitch after any corner-space, make your first stitch a standing stitch) (sc in next 23 st, 2 sc+ ch 1 + 2 sc in corner- space) repeat 4 times, fasten off with an invisible join to 2nd sc [108 + 4 ch]

Diagram
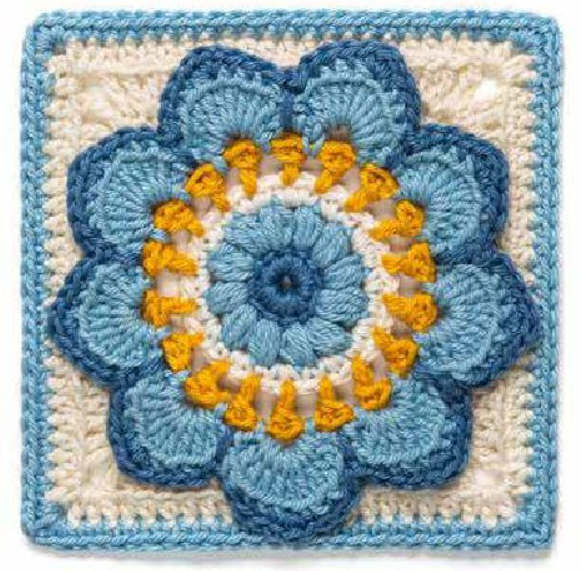
The Peacock Feather Puff Square pattern is a delightful way to infuse your crochet projects with the beauty and elegance of peacock feathers. Whether you’re creating a blanket, a pillow, or a decorative piece, this pattern is sure to impress with its intricate design and vibrant colors. So grab your crochet hook and yarn, and let your creativity take flight with this mesmerizing pattern! Happy crocheting!


