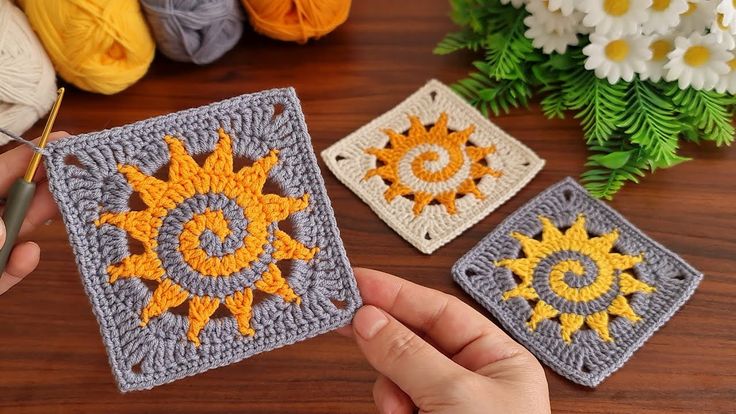
Round 2
With Yarn B: 2dc in each of the next 3 sts. Pull the loop slightly higher, secure, and remove the hook.
Switch to Yarn A: 2dc in each of the next 3 sts.
Total: 14 sts
Round 3
With Yarn A: 2dc in each of the next 6 sts. Pull the loop slightly higher, secure, and remove the hook.
Switch to Yarn B: 2dc in each of the next 6 sts.
Total: 26 sts
Round 4
With Yarn B: 2dc in each of the next 5 sts, 1dc in the next 2 sts, 1hdc in the next 2 sts, 1sc in the next 2 sts, sl st into the next st. Cut the yarn and secure the tail.
Switch to Yarn A: Repeat the same pattern as above.
Total: 36 sts
Round 5
With Yarn A:
ch2, 2dctog into the next 2 sts (Treated as 3dctog).
ch4, 3dctog into the next 3 sts, ch4. Repeat this around the square.
For the 7th 3dctog, start in the same st as the sl st.
Sl st at the top of the 2dctog. Cut and secure the yarn.
Total: 12 sets of (3dctog, ch4).
Round 6
Alternate Yarn A and Yarn B:
Using Yarn A: make a standing dc, but leave the last two loops on the hook. Complete the stitch with Yarn B.
With Yarn B: 4dc in the next ch4 sp. Do not finish the last dc, leave two loops on the hook, and switch back to Yarn A.
Repeat this color-changing pattern around the square.
Total: 60 dc
Round 7
With Yarn B:
ch1, 1sc in the same sp. Follow the sequence:
1sc in the next 2 sts, 1hdc in the next st, 1dc in the next 2 sts, 1tr in the next st, 2tr ch2 2tr in the next st.
Repeat this pattern three more times around the square.
Total: 72 sts with 4 ch2 spaces.
Round 8
With Yarn B:
ch1, 1sc in the same sp. Follow the sequence:
1sc in the next 8 sts, 2sc ch2 2sc in the next ch2 sp.
1sc in the next 18 sts, 2sc ch2 2sc in the next ch2 sp.
Repeat for the remaining sides.
Finish with a sl st into the first sc. Cut and secure the yarn.
Total: 88 sc with 4 ch2 spaces.
FREE CROCHET PATTERN HERE
Finishing Touches
Weave in all loose ends at the back with a tapestry needle.
Block the square to give it a neat and uniform shape.
Tips for Success
Practice the Magic Ring if it’s new to you—it makes a big difference in the finish!
Keep your tension consistent to achieve even stitches.
Feel free to experiment with colors to make your “Spiral Sun” uniquely yours.
We hope you enjoy this Spiral Sun Granny Square tutorial. Don’t forget to share your creations with us on social media or in the comments below. Happy crocheting! 🌞🧶


