Cat Paw Half-Finger Gloves Crochet Pattern

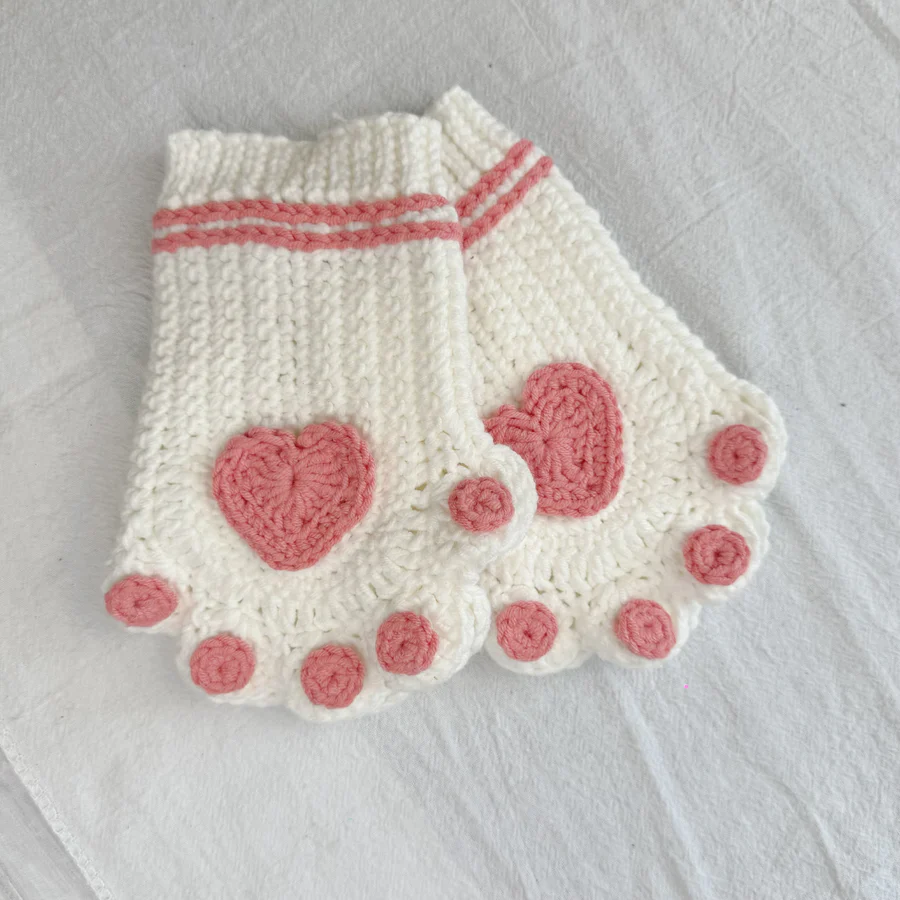
These adorable cat paw half-finger gloves are designed to be worn on both sides, making them playful, cozy, and extra versatile. The pattern features textured shaping, decorative stitches, and cute appliqués that give the gloves their signature kawaii look. Perfect for gifts, cosplay, or everyday wear during cooler seasons.

These half-finger gloves are not only practical but also incredibly fun to make. The construction combines simple stitches with clever shaping, making this project suitable for adventurous beginners and intermediate crocheters alike. Because the gloves are worked in flat panels and then joined, the pattern is easy to follow and allows you to clearly see how the structure is formed as you crochet.

Another lovely feature of this design is the decorative finishing. The cute paw pad and heart appliqués add personality and charm, turning a simple accessory into a statement piece. Whether you choose soft pastel yarns for a kawaii look or bold colors for a playful contrast, these gloves are a great way to experiment with texture and embellishments while creating something wearable and unique.

Materials

  • Medium weight yarn (color of choice)

  • Crochet hook suitable for your yarn

  • Yarn needle

  • Scissors

  • Hot glue (for attaching decorations)

  • Stitch markers (optional)

  • Crochet Abbreviations (US Terms)

    • ch – chain

    • sl st – slip stitch

    • sc – single crochet

    • hdc – half double crochet

    • dc – double crochet

    • inc – increase (2 stitches in the same stitch)

    • sk – skip

    Notes

    • Pattern is worked flat and then joined

    • Gloves are reversible

    • Stitch counts are critical at the corners

    • Front and back panels are worked separately, then joined

    Front Panel

    Foundation

    1. Make a slip knot.

    2. Ch 15.

    3. Starting from the second-to-last chain, work 13 sc.

    4. In the first chain, work 3 sc.

    5. Turn.

    Row 1

    • Sc 13 across.

    • Sl st to secure.

    • Turn.

    Row 2

    • Sc 13.

    • In each of the 3 corner stitches, inc (2 sc per stitch) → 6 sts.

    • Sc 13.

    • Sl st and turn.

    Row 3

    • Sc 1.

    • Inc in the next stitch.

    • Continue increasing every other stitch in the corner area until 9 sc are formed.

    • Sc 13 to finish the row.

    • Turn.

    Rows 4–6

    • Continue working sc across.

    • Add 3 stitches at each corner per row, following the stitch count progression shown in the video.

    • Row 6 completes the shaping.

    Row 7 (Texture Row)

    • Sc 10.

    • Hdc 2.

    • Dc 3.

    • In the corner section:

      • Dc 3

      • Inc every 3 stitches until 20 dc total

    • Dc 3.

    • Hdc 2.

    • Sc 11.

    • Sl st and turn.

    Row 8

    • Sc 11.

    • Hdc 1.

    • Sk 1, 5 dc in next stitch (repeat across decorative section).

    • Continue following stitch placement shown in the video diagram.

    • Sl st and turn.

    Row 9 (Front Panel Complete)

    • Sc 17.

    • Inc (2 dc) in each of the 3 central dc stitches.

    • Sc 3.

    • Repeat dc increases.

    • Finish with sc 13.

    • Fasten off.

    Back Panel

    • Rows 1–7 are worked exactly the same as the front panel.

    • Rows 8–9 are worked in the opposite direction, mirroring the front.

    • Follow the same stitch counts.

    Joining the Panels

    1. Hold front and back panels together.

    2. Join using sc along the edge.

    3. Work 12 sc, stitching both panels together.

    4. Leave openings for the thumb and fingers.

    5. Continue joining between fingers using sc.

    Bottom Edge

    1. Attach yarn at the side.

    2. Work 36 sc evenly around the bottom edge.

    3. Sl st to join.

    Finger Ribbing

    1. Ch 7.

    2. Starting in the second chain, work 6 hdc.

    3. Attach to glove with sl st.

    4. Turn and work in back loops only.

    5. Repeat around, skipping 12 sc total as indicated in the video.

    6. Sew side seam to secure.

    Wrist Rounds

    • Work 2 rounds of hdc evenly around the wrist (36 stitches per round).

    Cat Paw Pad (Small Ball)

    1. Magic ring.

    2. Work 10 sc into the ring.

    3. Pull tight.

    4. Sl st and fasten off.

    Heart Appliqué

    1. Magic ring.

    2. Ch 3 (counts as dc).

    3. Work 3 dc, ch 1.

    4. Work 3 dc, ch 3, sl st.

    5. Tighten ring.

    6. Work sc evenly around the heart shape.

    7. Fasten off.

    Free PDF Here!

    FREE PDF HERE

    Finishing

    • Use hot glue to attach the heart and paw pad to the glove.

    • Weave in all ends securely.

    Your reversible cat paw half-finger gloves are now complete!

    You Are Here:

    We use cookies to offer you the best experience on our website. By continuing to browse, you confirm that you accept these terms.