To finish off, you need 5 chain (see the piece in italics above.) So your starting chain needs to be in multiples of 5 chain PLUS 8 chain (to start) and 5 chain (to finish), e.g. I start with
103 chains: 5 + 8 (beginning and end) + 90 stitches (18 x 5-stitch repeats)
Row 1
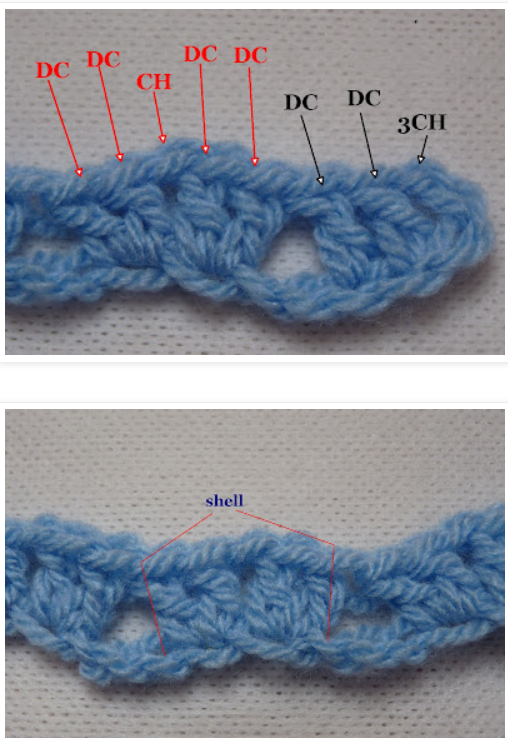
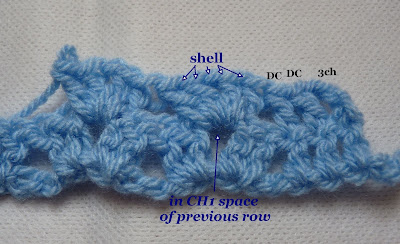
Row 2: 3CH (counts as first DC here and throughout), DC in next two stitches. In the chain space created in the shell in the row below, crochet a shell [=2DC-1CH-2DC]. Crochet a shell [=2DC-1CH-2DC] in the chain space in each shell in the previous row. Repeat till you reach the last three stitches, 1DC in each.
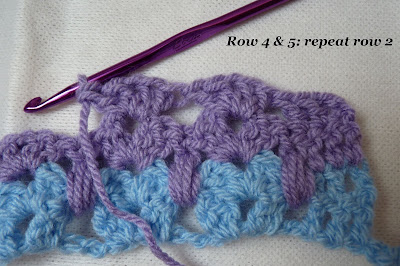
Row 2
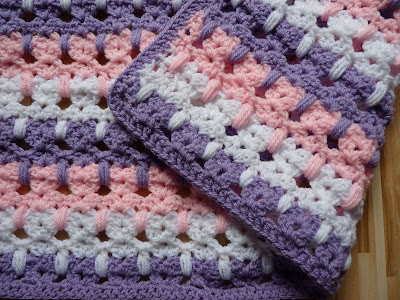
Change colours. From now on, we’re going to crochet cats! You need a new colour every three rows.
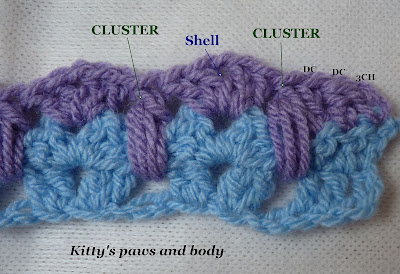
Row 3 (kitty body and paws): After the first three DC, you’ll continue with cluster – shell – cluster – shell – cluster etc. Finishing with a cluster before the 3 DC at the end.
What is this in pattern terms?
In this blog, I share my passion for crochet through patterns, tutorials, and musings. From adorable amigurumi to elegant shawls, there’s something here to ignite your creativity and keep your hooks busy.
3CH, DC in next two stitches. * Cluster [=Yarn over, insert hook into the space between shells two rows below, yarn over, draw up the yarn to the working row. Do this THREE times, so you have 7 loops on your hook. Yarn over once more and draw it through the first 6 loops on the hook, yarn over again and draw through the last 2 loops on hook.]. Crochet a shell [=2DC-1CH-2DC] in chain space of shell in the previous row, crochet a cluster between this shell and the next. Repeat from * (cluster – shell – cluster ) till you reach the last three stitches, 1DC in each.
Row 3
Row 4 (kitty face): 3CH (counts as first DC here and throughout), DC in next two stitches. In the chain space created in the shell in the row below, crochet a shell [=2DC-1CH-2DC]. Crochet a shell [=2DC-1CH-2DC] in the chain space in each shell in the previous row. Repeat till you reach the last three stitches, 1DC in each.
Row 5 (kitty ears): Repeat row 4.
Row 5
Doesn’t look much a like a cat yet, does it? Well, this is where it starts to get interesting… Change colours again and repeat rows 3, 4 and 5. Has your first pussycat appeared yet?
.
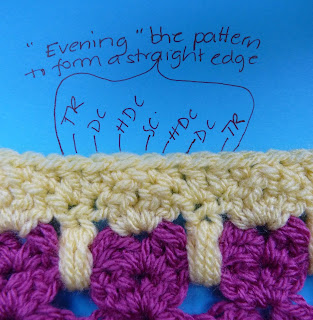
Second-last row: Repeat row 3 Last row:
3CH, DC in next two stitches. TR in next stitch (in cluster of previous row), DC, HDC, SC in each of the next three stitches (you should now be at the chain of the shell in the previous row), HDC, DC, TR (in cluster of previous row). Do you see what we’re doing? We’re trying to even it out and create a nice top edge. Continue till the last three stitches, 1DC in each.
.
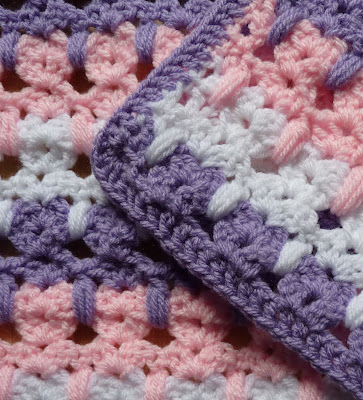
Edging: 3 chain, then DC around the edge of the blanket. It’s best to use a smaller hook because you’ll have to wriggle it through the stitches on the side and bottom of the blanket. I create a corner by simply doing 2DC in the corner of the blanket, 1CH, then 2DC in the same stitch.
.
With the Cat Afghan Baby crochet pattern, you’ve not only created a cozy and charming blanket but also a cherished keepsake for a special little one. Whether it’s for your own bundle of joy or a gift for a loved one, this delightful project is sure to bring warmth and smiles for years to come. Happy crocheting!